Streaming to Twitch/YouTube on a Raspberry Pi 3? - Yes I Did (Guide)
4/20/2021
Back Story
Around a year ago I decided to take my website off of it’s shared hosting plan and decided to host it myself on my brand new Raspberry Pi 3B+. After a year of realizing how little resources my now dedicated web server was using, I decided to turn it up a notch – host a TwitchPlaysPokemon-Style stream AND host my web server at the same time.
After many hours of doubt, I found success: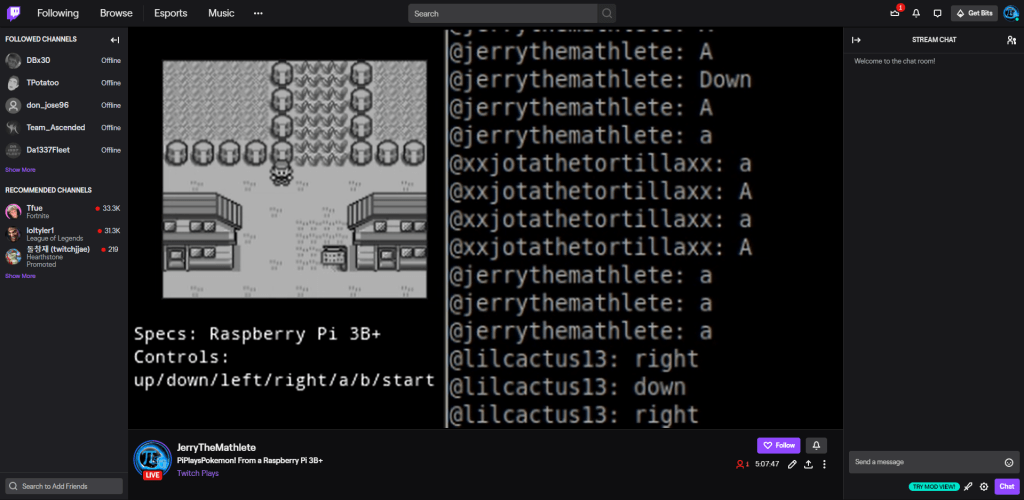
That’s very impressive. I managed to get a very stable and watchable (low resolution) stream coming out of my Raspberry Pi (and don’t forget about the web server also running. Although TwitchPlaysPokemon is very old, and much more spinoffs exist this day, it is still unique to be coming out of a PC with 1GB RAM that consumes less than 5 watts on full load.
How to Do It
Anyone with beginner-to-intermediate level Linux terminal experience can easily do this!
First, you’re going to want to update the Pi to the latest version of your packages. You may want to back up your SD card if you have important files.
sudo apt-get update
Next, you want to also have a desktop environment installed. If don’t know what I mean, can you navigate the Pi with a mouse? If so, you’re fine. If not, install LXDE, it’s extremely lightweight and it’s what i use. Installing so is not covered by this guide but it’s simple to do with the right Google search.
Install OBS
Original guide: https://obsproject.com/forum/threads/obs-raspberry-pi-build-instructions.115739/
Step 1: Create a Swap File
sudo dd if=/dev/zero of=/var/swap2 bs=1024 count=1000000
sudo chmod 600 /var/swap2
sudo mkswap /var/swap2
sudo swapon /var/swap2
sudo swapon
Step 2: Open up your favorite Text Editor and paste the following snippet in it. Save it in /home/pi/Downloads as installobs.sh
#!/bin/bash
#File: installobs.sh (sudo chmod +x installobs.sh)
#!!! Please run from /home/pi/Downloads (cd /home/pi/Downloads)

sudo apt-get --allow-releaseinfo-change update
sudo DEBIAN_FRONTEND=noninteractive apt-get -y dist-upgrade
sudo apt-get -y install build-essential checkinstall cmake git libmbedtls-dev libasound2-dev libavcodec-dev libavdevice-dev libavfilter-dev libavformat-dev libavutil-dev libcurl4-openssl-dev libfontconfig1-dev libfreetype6-dev libgl1-mesa-dev libjack-jackd2-dev libjansson-dev libluajit-5.1-dev libpulse-dev libqt5x11extras5-dev libspeexdsp-dev libswresample-dev libswscale-dev libudev-dev libv4l-dev libvlc-dev libx11-dev libx11-xcb1 libx11-xcb-dev libxcb-xinput0 libxcb-xinput-dev libxcb-randr0 libxcb-randr0-dev libxcb-xfixes0 libxcb-xfixes0-dev libx264-dev libxcb-shm0-dev libxcb-xinerama0-dev libxcomposite-dev libxinerama-dev pkg-config python3-dev qtbase5-dev libqt5svg5-dev swig
sudo wget https://ftp.uk.debian.org/debian/pool/non-free/f/fdk-aac/libfdk-aac1_0.1.4-2+b1_armhf.deb
sudo wget https://ftp.uk.debian.org/debian/pool/non-free/f/fdk-aac/libfdk-aac-dev_0.1.4-2+b1_armhf.deb
sudo dpkg -i libfdk-aac1_0.1.4-2+b1_armhf.deb
sudo dpkg -i libfdk-aac-dev_0.1.4-2+b1_armhf.deb
sudo git clone --recursive https://github.com/obsproject/obs-studio.git
cd obs-studio
sudo mkdir build && cd build
sudo cmake -DUNIX_STRUCTURE=1 -DCMAKE_INSTALL_PREFIX=/usr ..
sudo make -j4
sudo make install
obs #only need to run this command from now on

exit 0
Step 3: Give it executable permissions:
sudo chmod +x installobs.sh
Step 4: Run it, either from the desktop or command line, whichever way, with sudo permissions.
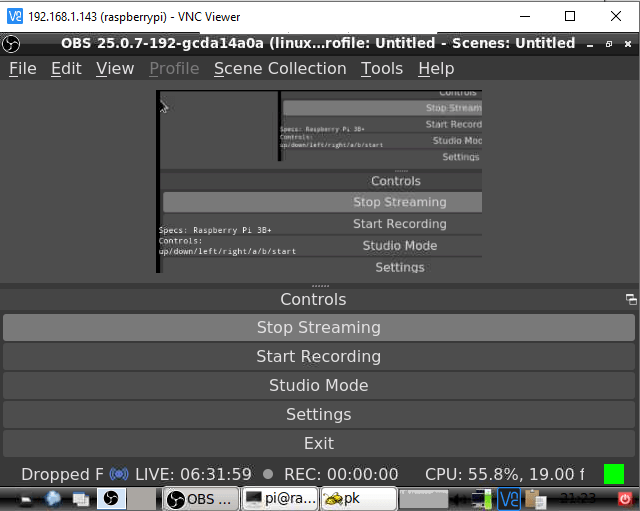
After that, run OBS from the command line, and it should work. Note for best speed, I also dropped the screen resolution of the Pi itself to 640×480
NOTE: If you get any errors about your GPU being unusable, make sure you disable any experimental GL drivers using the Raspberry Pi Configuration Tool (raspi-config)
Below are the settings I am currently using to stream, once you get your scene set up I HIGHLY recommend turning off your preview as it uses precious CPU cycles and WILL reduce your highest potential frame rate.
- Video Bit Rate: 650 Kbps
- Audio Bit Rate: 32 Kbps (fine for GB audio)
- Canvas / Output Resolution: 462 x 260 @ 20 FPS
- x264 Preset: Ultrafast
I also recommend using as little video sources as possible, as using more than 1 video source will absolutely prevent you from getting 15fps, even at 240p resolution.
Install an Emulator
There is no required emulator, but the one I’ve had the best luck with is mednafen, it’s multi-platform too:
sudo apt-get install mednafen
Get some ROMs
Yeah…you know how this goes… However I’m pretty sure you’re very capable of doing this yourself.
Start Streaming
Configure OBS like you would on a normal desktop and click “Start Streaming”. You can either plug in a microphone and stream yourself, or set up a viewer-controlled interactive stream like I did.
The source code for the TPP script running on the Pi (with build instructions) can be found at https://github.com/hzoo/TwitchPlaysX
Questions:
- Will this work on an RPi older than the 3B+?
- Extremely likely not, your best bet would be is to overclock a 3B, but certainly not with a 1/2.
- Will this work on an RPi 4?
- Yes, if it works with the 3B+, I can pretty much guarantee the 4 will be much easier to do.
- Could I stream other games?
- Likely not, the original Game Boy can literally run on your old graphing calculator, and uses less than 5% CPU usage on my Raspberry Pi. With my current set up, I am pushing 75%+ capacity on both the CPU and RAM (keep in mind I need space for a website too). I’m pretty sure SNES/ GBA will also struggle on the Pi 3, maybe not the Pi 4.
- What if I don’t have/want a Raspberry Pi?
- There are a lot of other small single-board computers out there that are capable of this, especially the RockChip-based boards, such as RockPi. Those are actually more powerful than a Pi 4 and should not run into any problems.
- Can I do it on a 1GB RAM Windows 10 Install?
- Unless you have a dedicated GPU/ Video Encoder – no. If you have a GPU, you will also be using a lot more than 5 watts be assured :). If you have under 2GB of RAM you should not be running Windows 10, unless you only use 1 program at a time.
- Any other ideas on a similar setup?
- This can certainly be done on a low-end VPS, from either AWS, Azure, or Google Cloud. However, this is quite expensive, as the Pi itself is $35, and uses very little electricity to run. A VPS that would support this will at least cost you $15-20 per month (burstable instances not recommended!).
Have any other questions? Leave a comment below, or find me on the following networks:
- Twitter: @JerryDaMathlete
- Instagram: JerryDaMathlete
Until then, have fun streaming from your Pi!